Watch a Video:
Linking Vantage Assignments in D2L Brightspace
Linking Vantage in D2L: 1 Link and Multiple Grade Syncs
Linking Vantage in D2L: Multiple Links and and Grade Syncs Per Chapter
Linking Vantage in D2L: Multiple Links and Grade Syncs in a Single Module
TABLE OF CONTENTS
- Create a new Vantage course or copy an existing Vantage course
- Adding Willo Labs to a New D2L Brightspace Course
- Deep Links and Grade Sync in a new D2L Brightspace course
Create a new Vantage course or copy an existing Vantage course
Before you can add deep links or grade sync items to your D2L Brightspace course, you must create your Sage Vantage course.
- Login or sign up for Vantage here. If you are not sure what your password is, you can click the "Forgot Password?" link to reset it.
- How do I create my Vantage course?
If you have created a Vantage course in the past, you may wish to copy the course or course sections, please see How do I copy my Vantage course?
Once you have created or copied your Vantage course, you must add the Willo Labs link to your course before your Vantage course can be paired with your D2L Brightspace course.
Adding Willo Labs to a New D2L Brightspace Course
1. Navigate to the module in your course where you would like to place the Willo Labs link (create a module if necessary). Click on Add Existing Activities to expand the action menu. Choose External Learning Tools

2. In the "Add Activity" pop-up window, click Create New LTI Link.

3. On the Create page, add the link details.
- Name: Willo Uno
- LTI URL: https://app.willolabs.com/onelink/
- Tool: Legacy LTI Tool

4. Click Create and Insert to add the link to the module.
5. Set the link to open in a new window.
- Select the action menu icon next to the link's name and choose Edit Properties In-place.

- Tick the checkbox to Open as External Resource. This setting will be saved automatically once you click the checkbox.

6. Select the Willo Uno link to pair your D2L Brightspace course with Willo Labs.
7. Enter the Product Token provided by Willo Labs. Select Verify.

8. The product details matching your product token will display. If they are correct, click Confirm. If they are not correct, you can select the Reset button that appears above the product details to add a new product token.

9. You will see a success message to indicate the pairing with Willo Labs is complete.

Deep Links and Grade Sync in a new D2L Brightspace course
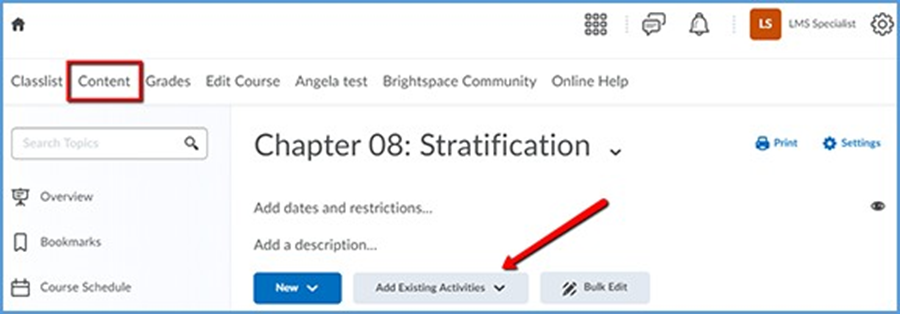
1. In the course Content area, locate the module where you wish to add your links. Choose Add Existing Activities to open the menu.
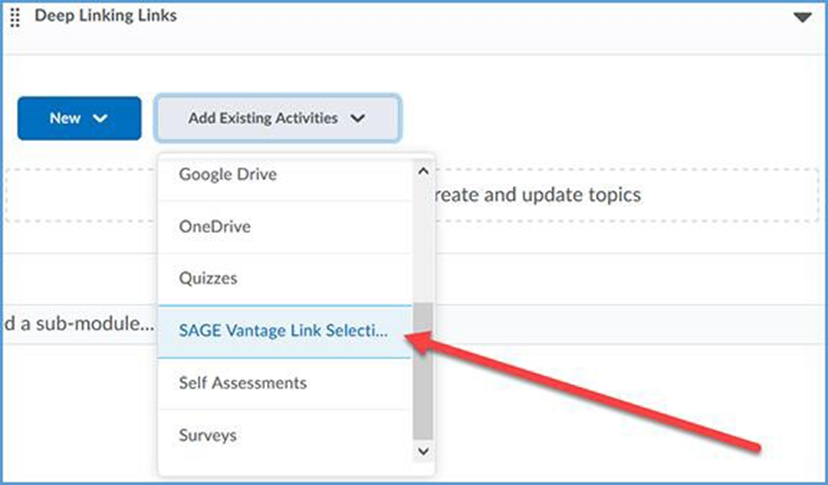
2. From the Add Existing Activities menu, select the Sage Vantage Tool.
3. Locate the Vantage course you wish to pair with, then choose Select. If you only have one Vantage course in your account, it will automatically be selected for you.

4. After selecting your Vantage course, the link selection page will load. Three dropdown menus are available to help you filter content in your Vantage course. They will help you narrow content selections to more easily pick links and grade sync items. We recommend using only one filter at a time:
- Resource Types – Filter by a single resource type such as Readings, Chapter Tests, etc.
- Chapters – Filter content by a single chapter
- Assignments – Filter only assignments or by assignment status (assigned for grade / completion or unassigned)

5. Once you filter the content, the sorted list will show only those items matching your selection. You can choose items from the resulting list to create deep links and/or grade syncs in your D2L Brightspace course.
For each item in the list, there are two columns on the right of the page. The left column (Link to Course) refers to the deep link that is added to your D2L Brightspace module. The right column (Grade Sync) determines if an assignment is synced with your D2L Brightspace gradebook.
If an item is not gradable – such as a chapter reading – the grade sync column will not have a checkbox. It will instead have a dash indicating it cannot be synced. If you have previously grade synced an assignment, the Grade Sync column will show a dash as well indicating it's already synced.

Create Deep Links (with or without grade sync)
To create a link in your D2L Brightspace course, choose one or more items you wish to add by ticking the checkbox in the "Link to Course" column for that item. If you select a gradable item (such as a Knowledge Check, Video Activity or Chapter Test), the Grade Sync column is automatically ticked as well. This allows you to create a link and a grade sync item at the same time.

To add a link for all items in the sort list, use the "Select All" checkbox above the "Link to Course" column. All checkboxes will be ticked including any associated Grade Sync items.

After you've selected one or more links to add to your D2L Brightspace course, select Continue to review your selections. This button is available at the top and bottom of the page.
Double check your selections on the "Confirm LMS Selection(s)" page.

If you want to add more items, you can use the Go Back button to choose more content. When you review, you will see all choices you have made.
Once you have picked all links you want to add to your D2L Brightspace module, select Continue on the "Confirm LMS Selection(s)" page to return to the module in D2L Brightspace.

Create grade syncs only (without deep links)
You can add grade sync assignments without adding deep links for them. For example, you may want to link only a single chapter reading in your D2L Brightspace module, but still have all assignments from that same chapter grade synced with your D2L Brightspace gradebook.
If you want to grade sync only specific assignments, you can tick the Grade Sync checkbox next to those assignments. Only the items you choose to grade sync will create a gradebook column in D2L Brightspace. In this example, a Knowledge Check and Video Activity are selected for grade sync, but the Data Activity is not.

If you want to grade sync everything in the filtered list – for instance, if you filter by Chapter Tests and want to grade sync all of them – you can tick the "Select All" checkbox above the Grade Sync column. All items will be selected for grade sync.

When you choose to Grade Sync an assignment, a gradebook column is created in your D2L Brightspace gradebook for the assignment.
After you've selected one or more items to grade sync, select Continue to review your selections. This button is available at the top and bottom of the page.
Double check your selections on the "Confirm LMS Selection(s)" page.

If you want to add more grade sync items, you can use the Go Back button to add more grade syncs. Once you have picked everything you want grade synced, choose Continue on the "Confirm LMS Selection(s)" page to complete the grade sync.
After a few seconds, a pop-up message indicates that no links were created. Click OK to return to D2L Brightspace. You can visit your D2L Brightspace gradebook to see the new columns that were added for your assignment selections.

6. When you are finished adding deep links and grade sync items to your D2L Brightspace course, select a Vantage link to complete the grade sync connection. If you do not select a Vantage link, Vantage will not send grades to your D2L Brightspace gradebook.
Note: If you add new grade sync items at a later date, you must click on a Vantage link again to complete the grade sync connection for the new items.

7. We recommended that you set your links to open in a new window for accessibility purposes, as well as providing a better user experience for students who are accessing the course on mobile devices.
- Next to the Vantage link in your D2L Brightspace course, expand the action menu. Choose Edit Properties In-place.

- Tick the checkbox to Open as External Resource. This setting will be saved automatically once you tick the checkbox.

Include Grade Synced Assignments in Your D2L Brightspace Gradebook
By default, D2L Brightspace excludes the grade synced assignments from the final grade in your gradebook. Follow these steps to include the assignments in your final grade calculations.
TIP: Knowledge Checks, Video Activities, etc. are often assigned for completion instead of a grade in Vantage. If you choose to grade sync these assignments, the gradebook column in D2L Brightspace will record the point value to show the assignment was completed. While you may want your D2L Brightspace gradebook to show these assignments were completed, you may not want to include these points in the final grade calculations. Since point values are already excluded by default when added to your gradebook, you can leave the Exclude from Final Grade Calculation checkbox ticked.
1. You can confirm whether the assignment will be included or excluded by going to Grades > Manage Grades.
If the assignment is being excluded, an exclamation point follows the item name.
Note: The Bulk Edit function does not work to update the Vantage assignment settings to include these items for a grade. The setting is updated elsewhere.
2. To include the assignments in the final grade, go to the Enter Grades tab.
3. Expand the Action menu for the assignment, then select Edit.
4. On the Edit Item page, scroll down to the Grading section. Untick the checkbox under Exclude from Final Grade Calculation. Make sure to Save your changes. Once you clear this checkbox, the grade for that item will be included in the final grade.
Was this article helpful?
That’s Great!
Thank you for your feedback
Sorry! We couldn't be helpful
Thank you for your feedback
Feedback sent
We appreciate your effort and will try to fix the article